Customer User Guide
This is a guide for the customer users of the ICS-digital Marketplace platform.
User Interface
Application Layout
The application’s layout is rather uniform so you will always see the content on your screen laid out in a similar way to this image. Please read along to understand what each of these sections are and how you can use them to access all the different parts of the marketplace application and achieve your goals.
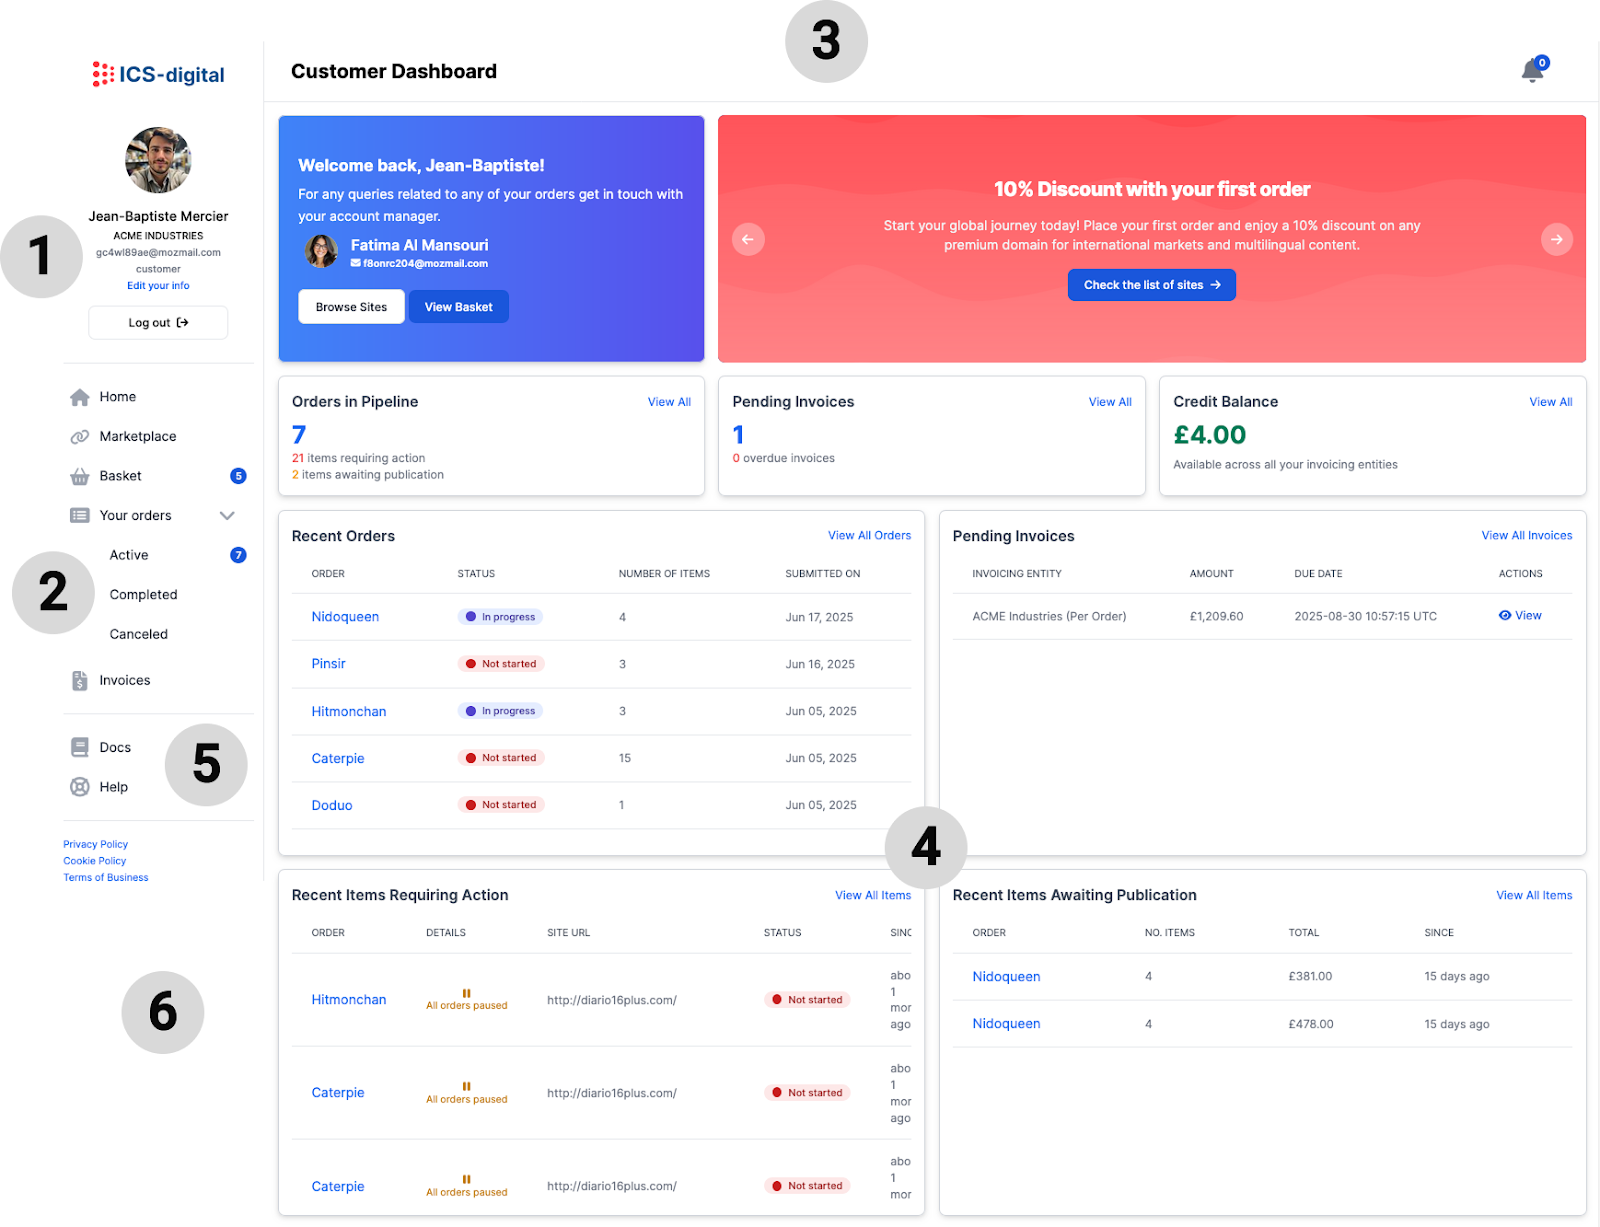
1. User Info Area
This area contains all the main information about you. You are also provided with a link to edit your user information, as well as a button to log out of the application.
2. App Menu
This is one of the most important sections of your application layout as it will allow you to navigate through all the most essential information and functionalities this app has to offer.
Home
This is your homepage and the first section you will see when you log in. This section contains a panel with your account manager contact details, a carousel displaying recent news and offers. Below you will find a dashboard containing essential information about your most recent orders. Each of the panels on the dashboard are explained in more detail in the dashboard section of this guide.
Marketplace
The Marketplace section contains the full list of domains that we offer along with useful metrics and parameters related to these. You can use the various table filtering, sorting and searching capabilities to find the sites that best fit your requirements. To understand how to make the most of the Marketplace section please read this guide’s section “Finding sites for your publications”.
Basket
In the basket section you will find all the sites you have selected from the Marketplace section as potential items in your order. There you will find different options that will help you shape your order to match your preferences and budget. Please refer to the “Creating an order” section for a more detailed description of all the features available to you in the basket section.
Your orders
This section contains links to tables listing all your active, completed, and canceled orders.
- Active orders are still in the publication pipeline.
- Completed orders have been successfully published.
- Canceled orders were discontinued for any reason.
You can track the progress and status of all your orders here. For more information on how your orders are processed, please refer to the “Your order’s journey” section of this guide.
Invoices
In this section you will be able to access all the invoices related to your orders and those of your company. You will also be able to download a PDF version of them. For more information please visit this guide’s section “Invoicing and payments”.
3. Title & Notifications Bar
This section simply contains the title of the specific page you are visiting and a link to all the latest notifications about your orders and invoices.
4. Main area
This is the main work area and it is dedicated to the most important information of every section of the application. When you’re logged in, every link that you click on the application menu will replace the content on this area with content related to the section you wish to visit.
5. Reference
This section of the sidebar is there to allow you to easily find helpful information and documentation about the ICS-digital Marketplace as well as finding contact information for any support queries.
6. Additional links
This section contains links to ICS-digital’s policies that describe all the regulations and obligations that you and us acquire and must abide by when doing business together. Please make sure you read them carefully before proceeding to order.
Registration, Login & Account management
Requesting Access
The access to the ICS-digital marketplace is invite based. In order to request access you need to visit https://marketplace.ics-digital.com/get-started and fill out the access request form. We will then do a quick vetting process and set you up with a new account. Once your request has been adequately vetted, you will receive an invite via email containing a link that will allow you to log into the application.
Initial setup
First login
Once you’ve been invited to join the application, you will receive an email from the Marketplace containing a link to accept the invitation. Clicking this link will take you to the application, where you’ll be prompted to set a password for your account.
From that point on, your login credentials will be the email address that received the invitation and the password you just created. After setting your password, you will be redirected to your Marketplace homepage.
Setting up user info
You can set up additional info about your user by clicking on the “Edit your info” link on your User Info Area.
Account
Use this form to update your basic information. We set up your preferred currency and timezone to our own by default but please feel free to adjust them. At the moment we only support British Sterling Pounds, US dollars, and Euros as currencies.
Security
Use the form on this section to change your password. Please make sure you have your current password at hand as you will need it.
Billing info
The information you provide on this form will be used as your first default invoicing entity to which we will address the invoices for your orders. You can add other invoicing entities and change your default invoicing entity. This is explained in more detail in the Client & invoicing entities section of this guide.
Business info
In this section you can set up your contact and business information. We need your contact information to allow us to reach you if there are any issues with your billing or your account. We also request additional business information to better understand your needs and tailor our services to your specific requirements. By providing this information, we can offer personalised solutions that are more aligned with your business goals.
Invoicing Entities
Here you can view all of the different invoicing entities that belong to your company and edit them, as well as creating new ones. Everything related to your invoicing entities is explained in better detail in the Client & invoicing entities section of this guide.
Login issues
Did you forget your username?
Contact your manager or support.marketplace@ics-digital.com and one of our representatives will get in touch and send you your username.
Did you forget your password?
- Go to the login page
- Click on the “Forgot your password?” link.
- Fill out your email on that form and click on “Send me reset password instructions”
- Shortly after you will receive an email with instructions on how to access your account.
Did you lock yourself out of your account?
If you locked your account by repeatedly submitting the wrong credentials you should hava received an email with instructions on how to unlock your account. If you didn’t you can:
- Go to the login page
- Click on the “Didn’t receive unlock instructions?” link.
- Fill out your email on that form and click on “Reset unlock instructions”
- Shortly after you will receive an email with instructions on how to unlock your account.
Finding sites for your publications
Finding the right domains to publish your content can make or break your outreach strategy. Our marketplace takes the guesswork out of the equation by offering a curated selection of high-quality domains across a wide range of niches, markets, and metrics. Whether you’re focused on SEO, audience relevance, or brand credibility, our platform helps you discover sites that match your publication goals.
Each domain is vetted for quality—think traffic, backlink profile, domain authority, and editorial standards—so you can be confident your content appears in the right context. Advanced filters and powerful search tools make it easy to narrow down by category, language, country, specific metrics, and more!
In this section we will explain how you can make the most of the ICS-digital Marketplace searching and filtering features to find the ideal site for your campaign.
Marketplace page structure
The Marketplace page can be broken down into six different sections: Basic filters, Advanced filters, Search & Pagination, Cost column and Site information.
-
Basic filters
This section provides the most essential filters which will help you quickly get to the site you want based on the most general parameters: Country, Markets, Languages, Categories and Cost range. You can select one or more options on all the dropdowns and they will work differently depending on the field you are filtering on.
Country
The Country filter will allow you to narrow down the results using the main country listed for each site. You can use the dropdown’s search box to find a specific country or simply scroll down the list. You can also select many different countries if you want to see results that have either of the countries selected (e.g. sites with country parameter set to US or UK)
Language
Similarly, the Language filter allows you to narrow down results based on that parameter and it will also let you filter using many different language options to display sites with either of the languages selected as their language parameter (e.g. sites with language parameter set to French or English.
Markets
The Markets dropdown also allows you to select many countries but its functionality differs slightly from the previous examples in that it will yield results with sites contain all the selections (e.g. sites for both the Mexican and Colombian markets)
Categories
Similarly, the Categories dropdown will allow you to get in your results sites that contain all the categories selected on the filter. (e.g. sites that belong to both the Finance & Crypto and the Casino & iGaming categories)
Cost min./Cost max
The Cost min. And Cost max. fields are a way for you to filter out your search by price range thus making sure you stay within your budget constraints.
-
Advanced filters
The advanced filters section allows you to narrow down your results through more specific parameters such as niches allowed, link preferences and different metrics ranges.
Niches allowed
This group of filters allows you to select or reject sites that are willing to publish content with topics and links of specific niches that are often regarded unsuitable for most websites. Whenever you want to query for sites that allow a specific niche you should pick “Yes” from its corresponding dropdown, on the other hand if you want sites that do not allow this type of content you should select “No”. If you want the system to ignore whether or not the site accepts a certain niche you can simply select the blank option. More information on specific niches can be found on the Niches section of this guide.
Link Preferences
These filters compile different preferences and requirements from site owners that might be relevant to you. They work in a similar way to the niches filters with “Yes”, “No” and blank options. More information on these can be found on the Link preferences section of this guide
-
Search, Sorting and Pagination
The Marketplace sites table has some search, sorting and pagination capabilities to help you to better parse your results. The “Show” dropdown allows you to set up the number of results per page that you want to see. You can navigate through all the result pages using the page links at the bottom of the page and view the number of results obtained with your specific search and filtering queries. The columns containing this type of link will sort the results when you click on it.
The search box allows you to find sites using their URL, simply leave out the “https://” and type the address. You can also use the search bar to filter out sites by their TLD. For example if you type “co.uk” the system will return only URLs that contain that ending.
-
Cost column
This area contains all the cost related information for our sites as well as a button to add them to your basket. Please refer to the “Cost” section below for more information on this column.
-
Site information
This section contains all the columns with specific information about every site in the ICS Marketplace database. Please refer to the “Site parameters & Metrics definitions” for more information about the information on each of these columns.
Site parameters & Metrics definitions
Parameters
Cost
The Cost column contains 2 or 3 items: the site cost in your preferred currency, the Buy button, and, in cases where a discount has been applied, a strikethrough version of the original price. You can use the Buy button to add a site to your basket, after this you will still need to review your order and follow the checkout process as described in the “Checking out” section of this guide.
URL
The URL contains the address for the site comprised by its protocol (i.e. http:// | https//), its subdomain (e.g. www), and its domain (e.g. example.com).
Country
The site’s country is generally determined by its intended audience. While technical clues like the site’s top-level domain (TLD), such as .uk or .de, or the server’s IP geolocation can suggest a country, these are not always definitive—many sites use generic TLDs like .com and host content in different regions. More accurately, a site’s language, currency, contact details, and the geographic focus of its content or services reveal its target country. Ultimately, through our relationship with webmasters we have a good understanding of the audience a site is built for which generally provides the clearest indication of its national association.
Language
A site’s language refers to the primary language used in its content, navigation, and user interface. It typically reflects the linguistic preferences of the target audience and plays a key role in accessibility and user experience. The site’s language is often one of the strongest signals of its intended audience and market.
TLD
A site’s top-level domain (TLD) is the last segment of its web address—such as .com, .org, or country-specific ones like .fr for France or .jp for Japan. TLDs can provide clues about the site’s origin, purpose, or target audience. While generic TLDs like .com are widely used across the globe, country-code TLDs (ccTLDs) often indicate a national focus, though some are used more broadly or for branding reasons.
Categories
A site’s category describes the type of content or service it provides, helping classify its overall purpose. This classification helps users and search engines understand what the site offers and who it’s intended for. A single site may fall into multiple categories if it covers diverse topics or services.
The current list of categories includes:
- Adult
- Legal
- Golf
- Travel
- Rugby
- Tennis
- Business
- Motoring
- Cricket
- Cycling
- Education
- Lifestyle
- Baseball
- Technology
- Basketball
- Ice Hockey
- Food & Drink
- Motorsports
- Entertainment
- Home & Garden
- Horse Racing
- Combat Sports
- Snooker & Pool
- Sports Betting
- Sports General
- Casino & iGaming
- Finance & Crypto
- Football Soccer
- Health & Wellness
- American Football
- Video Games & Esports
- News & Current Affairs
Niches
A site’s link niche refers to its openness to publishing or linking to content in fringe, adult, or otherwise sensitive categories. It reflects the webmaster’s tolerance for non-mainstream topics, such as gambling, CBD, adult entertainment, or pharmaceutical products. Sites with a permissive link niche are more likely to accept paid placements or guest posts in these areas, making them valuable in certain SEO and content marketing strategies. Conversely, more conservative sites may strictly avoid such topics to maintain brand integrity or comply with ad and platform policies.
The niche classification we use for our sites is based on the following categories
- CBD
- Loan
- Forex
- Frypto
- Dating
- Erotic
- Pharma
- Gambling
Markets
A website’s market refers to the range of countries or regions it actively targets or serves, which can extend beyond its primary audience. While a site might be primarily aimed at users in one country—like a U.S.-focused news outlet —it can naturally attract visitors from other countries that share the same language (e.g. Canada, UK, Australia) or are geographically or culturally aligned. In short, a site’s market includes not just its core audience, but also the broader regional or linguistic communities it reaches or accommodates.
Allows home links?
This parameter describes the openness of a webmaster to publish your links on their homepage.
Adds sponsored tag?
This parameter determines whether or not the webmaster requires that the content includes a sponsored tag.
Are links do-follow?
This parameter informs you on whether the webmaster allows do-follow links within your content. If this is set to false it means the webmaster will require all of your content links to be no-follow.
Article duration
This parameter determines the minimum duration we can guarantee your article will be hosted for. This is typically 12 months but it can vary depending on the site.
Metrics
SEO metrics are data points used to measure a website’s visibility and performance in search engine results. They help evaluate how well a site attracts organic traffic, ranks for keywords, and earns authority or trust from search engines. These metrics are essential for identifying strengths, weaknesses, and opportunities in a site’s search strategy, guiding efforts to improve rankings and overall online presence.
The metrics we offer at ICS-digital marketplace are:
Domain Rating (DR)
Provided by Ahrefs. Domain Rating (DR) shows the strength of a website’s backlink profile compared to the others in our database on a 100-point scale. It’s essentially a less granular version of Ahrefs Rank (AR).
Ahrefs Rank (AR)
Provided by Ahrefs. Ahrefs Rank (AR) ranks all the websites in our database in order, by the size and quality of their dofollow referring domains — basically, by their DR.
Domain Authority (DA)
Provided by Moz. Domain Authority (DA) is a metric that measures the authority of a website based on the number and quality of backlinks it has. The higher the DA, the more authority the website has.
Spam Score
Provided by Moz. Spam Score (SS) represents the percentage of sites with similar features to the site you’re researching which Moz has found to be penalized or banned by Google. Spam Score is based on Moz’s machine learning model which identified 27 common features among the millions of banned or penalized sites in the data they fed it. A high Spam Score for your site, or a site you’re looking at, doesn’t mean this site is necessarily spammy. It’s a sign that you should do some more investigation into the quality and relevance of this site.
Outgoing links
Provided by Moz as root_domains_from_root_domain. Number of outgoing links (NOL) is a metric that measures the total number of links leaving a given domain.
Trust Flow (Root)
Provided by Majestic SEO. Trust Flow (Root) (TFR) is a score based on quality, on a scale between 0-100. Majestic collated many trusted seed sites based on a manual review of the web. Sites closely linked to a trusted seed site can see higher scores, whereas sites that may have some questionable links would see a much lower score.
Citation Flow (Root)
Provided by Majestic SEO. Citation Flow (CFR) is a score between 0-100 which helps to measure the link equity or ‘power’ the website or link carries. Citation Flow predicts how influential a URL might be based on how many sites link to it.
Trust Flow Ratio
Trust Flow Ratio (TFRt) is a metric that measures the result of the operation Trust Flow/Citation Flow.
Referring Domains (Root)
Provided by Majestic SEO. Referring Domains (Root) (RDR) is a metric that measures the sum of referring domains. A referring domain, also known as ‘ref domain’, is a website which has a backlink pointing to a page, or link, to the site you are analysing.
Organic Traffic (Worldwide)
Provided by Ahrefs. Organic Traffic (OT) in Ahrefs is an estimation of how many clicks from google your target website, subfolder or URL gets each month.
Keyword Ranking (Worldwide)
Provided by SemRush. Keyword Ranking (KR) is a metric that measures the total number of keywords that bring users to a website via Google’s top 100 organic search results.
Referring Domains (Worldwide)
Provided by SemRush. Referring Domains (RD) is a metric that measures the total number of domains, including common referring domains, linking to a given domain.
Creating an Order
Now that we have covered the Marketplace section, we’ll walk you through the full order creation process—from selecting sites in the Marketplace and adding them to your basket, to reviewing your order, naming it, applying discounts, and choosing your preferred billing method.
Adding sites to your order
Creating an order in the Marketplace is quick and straightforward. Start by browsing the Marketplace table where you can explore a wide selection of sites (see “Finding sites for your publications”). To begin your order, simply select the sites you’re interested in and add them to your basket using the “Buy” button.
Your basket
Once you’ve selected all your desired sites, head over to your Basket to review your order. Here, you can:
- Review, inspect and modify selected sites
- Name your order for easy tracking
- Apply any available discount codes or promotions
- Select your preferred invoicing entity, which will determine whether your order is per order or monthly, and also which billing details such as address, PO, VAT number, etc. should be applied to your order. For more information on invoicing entities please visit the “Client & Invoicing entities” section of this guide.
- Apply credit balance to this order if you have any
- Select whether you wish to provide details for your links and content. If you leave this option unchecked we will interpret this as you giving us the liberty to define details such as content publication date, anchor text, anchor text type, target url and content preferences.
- Select whether you would like to approve the content we write for your publication. If you leave this option unchecked we will interpret this as you giving us the freedom to publish the content after our internal content review process is completed.
- At the bottom of the basket checkout form you will find a breakdown of the total costs of your order including applied credit balance, discounts, and additional charges. For more information on any of these please refer to the “Invoicing and payments” section of this guide.
- Once you’re happy with the costs and all the information provided you can go ahead and click on “Checkout” to submit your order.
Your order’s journey
As soon as you’ve checked out the order in your basket your order will enter the content production and publication pipeline and your account manager will be notified of your request. Your account manager will get in touch with you before the end of the next working day to acknowledge your order, clarify any requirements and confirm the site availability.
From then on the order will enter the content production pipeline, where our writers and editors will start working on the content for each one of your order items based on a brief we put together based on the details you provided through the platform and any other details you may have explained directly to your account manager.
You can visit your “Active orders” page at any point to check on any of your order items’ status.
If you selected the option to approve the content during checkout, you will be notified when the content is ready for approval, at which point you can click to view the content document on Google Docs, leave any feedback as comments, and approve or reject the content using the links provided for each item on your order’s page.
If you feel the content isn’t quite ready yet, you can reject it by using the link provided and it will go straight back into the content pipeline, where our writers and editors will make sure to implement any feedback provided by you and your account manager. Once these changes have been implemented the order item status will be set to “Ready for approval” once again.
Once you are satisfied with the content provided, you can use the link to approve it. If you didn’t select the option to approve the content during the checkout process your order item will move straight from “In progress” to “Approved” once our internal review process has been carried out. Your account manager will be notified of this change and they will send the content out to the site’s webmaster for publication within one working day of the article being approved.
The content approval related statuses (i.e. “Ready for approval”, “Approved”, “Amendments needed”) will only be available for order items where you have requested to approve the content.
At this point the status will be set to “Awaiting publication” and will be set to live as soon as the webmaster confirms to your account manager that the content is live.
Once the article’s publication is confirmed your account manager will update the order item’s status to “Live” and update the publication link url. You will receive the live url on an email notification but will also be able to find it on the order item’s page. Which will be accessible through the order item’s “Show” link on your order’s page.
The history of status changes for any order and its items can be observed on the activity window on the order’s page sidebar as well as the individual order item’s page.
Description of order statuses
The order status will be displayed on each row of the “Active Orders” page and it will describe the status of the order as a whole. If you wish to see the status of each item in the order you need to access the order in question using the “Show” link. More information on order item statuses can be found on the “Description of order item statuses” section of this guide.
Not started
An order is in this status right after you have completed the basket checkout process or during the next working day of doing so. When an order is in this status the account manager will be responsible for acknowledging the order, liaise with you to discuss and clarify any specific aspects of the order, and get in touch with all the relevant webmasters to confirm the viability of every single item in the order. If you chose to provide the details for the links and publication, you will need to provide these before any items can be moved to status “In progress”.
During this period of time you can still cancel your whole order and no invoice will be issued, however, after the first item in the order is set to status “In progress”, the whole order will move into “In progress” status as well, at which point it will not be possible to cancel the order through the platform. Any cancellations past this point will need to be carried out in accordance with our “Terms of business” document and will require to be handled by the account manager outside of the platform.
In progress
As outlined in the previous section, as soon as the first order item is set to status “In progress”, the whole order will also be set to “In progress”. When an order is in progress it means that at least the content of its items is being produced, however, since the orders can contain several different items, they can all be at different stages at one time. For this reason it is always a good idea to check the specific order’s page to get a more complete idea of what status each of the items is in at any point. If you are a new customer, your first order will always be invoiced as a single order invoice (not monthly) and the payment will need to be provided upfront before any work can start. For more information about ordering for the first time please refer to the “Your first order” section of this guide.
Completed
The order status will automatically change to “Completed” once the last item of the order has been set to “Live”.
Canceled
An order will have status of canceled if it’s been canceled by you before any item has been set to “In progress” or in special cases by the account manager after having had a chat with you and agreed upon the terms of the cancellation.
Description of order item statuses
The order item status describes the current status of any item within an order.
Not started
An order item is set as “Not started” as soon as its parent order has been checked out by you. Whilst an order item is in this status the account manager will be confirming the site’s availability with its webmaster and waiting for you to submit any relevant details to the item if you chose to do so during the checkout process. At this point an order item can be canceled by you through the platform and it will be excluded from the order’s invoice.
In progress
An order item is set to status “In progress” as soon as:
- you have provided the item details, if you chose to do so during the checkout process
- your account manager has confirmed the site’s availability and disposition to publish this piece of content.
As soon as the first item in an order is set to “In progress” the whole order status changes to “In progress” and an invoice for it will be generated, or it will be added to a month draft invoice if the invoicing entity selected at checkout has an invoicing month of “Monthly”. At this point the order can’t be canceled by you any longer, although individual “Not started” items can still be canceled. If you are a new customer, your first order will always be invoiced as a single order invoice (not monthly) and the payment will need to be provided upfront before any work can start. For more information about ordering for the first time please refer to the “Your first order” section of this guide.
Ready for approval
If you selected the option to approve the content during checkout, you will be notified when the content is ready for approval, at which point you can click to view the content document on Google Docs, leave any feedback as comments, and approve or reject the content using the links provided for each item on your order’s page.
Amendments needed
If you feel the content isn’t quite ready yet, you can reject it by using the link provided and it will go straight back into the content pipeline, where our writers and editors will make sure to implement any feedback provided by you and your account manager. Once these changes have been implemented the order item status will be set to “Ready for approval” once again. This status is only available on items where the option to review the customer was selected at checkout.
Approved
Once you are satisfied with the content provided, you can use the link to approve it. Your account manager will be notified of this change and they will send the content out to the site’s webmaster for publication within one working day of the article being approved. This status is only available on items where the option to review the customer was selected at checkout.
If you didn’t select the option to approve the content during the checkout process your order item will move straight from “In progress” to “Awaiting publication” once our internal review process has been carried out and the content has been sent out for publication.
Awaiting publication
After the content has been approved and sent out to the webmaster your account manager will set its status to “Awaiting publication” where it will stay until a positive update from the webmaster is received and a live url is provided.
Live
Once the article’s publication is confirmed your account manager will update the order item’s status to “Live” and update the publication link url. You will receive the live url on an email notification but will also be able to find it on the order item’s page and also on the actions column of the order items list on the corresponding order page.
Canceled
As described previously an order item can be canceled by you directly before it has been set to “In progress”. Any cancellations past this point will need to be carried out in accordance with our “Terms of business” document and will require to be handled by the account manager outside of the platform.
Responsibilities of customer
As the customer, you are responsible for:
- Correctly setting up your user information.
- Correctly setting up invoicing entities containing correct billing information for your orders ahead of submitting them.
- Pointing out any discrepancies related to the content within the timeframe of the order processing. We cannot guarantee content changes after the content has been sent out for publication.
- Providing all necessary information and approvals as agreed upon during the checkout process. The timely publication of content depends on receiving these details and approvals on time. We can only guarantee timely publication if these requirements are met promptly.
Responsibilities of manager
Your account manager is responsible for:
- Acknowledging your order within the next working day after you check out an order in your basket.
- Clarifying any details that aren’t clear to them about your order.
- Confirm with the webmasters that the content you have requested can definitely be published on their site.
- Assigning the production and editing of the content to our content and editorial teams as well as following the content’s progress through the content pipeline making sure it is delivered on time and up to the quality expected.
- Relaying any feedback you may have provided about the content if you decided to participate in the content approval process during checkout.
- Sending out the content for every order item to the webmaster for publication within one working day of the content being approved.
- Updating the publication URL as well as updating the order item status to “Live” within one working day of having been notified by the webmaster about an item’s publication.
- It is also the manager’s responsibility to keep your orders and order items statuses up-to-date and to provide you with regular updates if any of your orders are experiencing delays.
Customer support
Your first line of support will be your account manager. If you are unsatisfied with the service provided by your account manager you can escalate any issues to our general support team by send an email to support.marketplace@ics-digital.com. If you are experiencing any technical issues whilst using the ICS-digital Marketplace platform you can notify our technical team by sending an email to techsupport.marketplace@ics-digital.com.
Content feedback and approval
Our preferred method of receiving content feedback is through the Google Document linked to each of your order items. This allows us to segment the feedback across the different articles and share it with any relevant internal stakeholders. However, we are always open to receiving your feedback and comments via email through your account manager first, or through the escalation point for content feedback on content.marketplace@ics-digital.com.
Publication issue handling
At ICS-digital, we take pride in our active, direct relationships with the webmasters we work with. This allows us to deliver a high level of confidence that publications will go live within the agreed timelines. However, on rare occasions, unforeseen issues may arise that result in a delay or cancellation of a publication by the webmaster.
In such cases, we offer several flexible solutions, including:
- A replacement domain with similar characteristics
- A refund in the form of credit within the ICS-digital Marketplace app
- A bank credit note or, if no payment has been made, an invoice voiding
Your account manager will present these options to you and help determine the best course of action based on your preferences.
If a publication does go live but does not meet expectations, we are happy to explore similar solutions. However, we will first aim to resolve the issue directly with the webmaster to ensure the best possible outcome.
Invoicing and payments
The ICS-digital Marketplace automatically generates a payable invoice addressed to the company associated with your account. Invoicing details and payment terms will be based on the invoicing entity you provided at checkout. Invoices may be issued monthly or per order, depending on the preferences set for the chosen invoicing entity. Please note that for first-time orders, an invoice will always be generated on a per-order basis and will be due upon receipt.
Client & Invoicing entities
Each customer account in the ICS-digital Marketplace is linked to an associated company or client. A company is assigned to your user account upon creation, based on the information provided by you when requesting access. All invoices generated will be addressed to that company and all users belonging to the same client have visibility over all invoices raised for the company. This is to facilitate different customer user accounts from the same company to have grouped invoicing entities and avoid unnecessary duplication.
Invoicing details—including billing address, invoicing mode (monthly or per order), VAT information, and purchase order references—are defined through an invoicing entity created by any user belonging to the same company.
At least one invoicing entity must be set up before any orders can be placed. Companies may create multiple invoicing entities if they require different billing setups for specific teams, departments, or projects.
Invoicing modes
Each invoicing entity in the ICS-digital Marketplace must be assigned an invoicing mode, which determines how billing is handled for any orders associated with that entity at checkout. The available modes are per order and monthly, each designed to suit different operational preferences.
Per order
When an invoicing entity with the per order mode is applied at checkout, an invoice is automatically generated as soon as the order status changes to “In Progress.” You will receive both an email and in-app notification informing you of the new invoice, which will be payable according to the payment terms defined for that invoicing entity.
Note: For any first-time order, the system will always generate a per-order invoice, regardless of the invoicing mode selected. This invoice will be due upon receipt.
Monthly
When using the monthly invoicing mode, each order (and its associated items) is added to a draft invoice for the current calendar month. All other orders linked to the same invoicing entity and created within the same month and year will be grouped under the same draft invoice.
If your company uses multiple monthly invoicing entities, each will generate a separate invoice for any orders processed during the same period.
At 00:00:00 UTC on the first day of each month, all draft invoices from the previous month are locked and converted to payable invoices (status: “Pending”). Payment will then be expected according to the invoicing entity’s specified payment terms. You will be notified of the new invoice via email and in-app notification.
Note: First-time orders are always invoiced per order and due upon receipt, regardless of the selected invoicing mode.
Promotions & Discounts
We regularly offer discounts on specific sites and orders through promo codes or limited-time promotions. These can be applied during checkout and may include site-specific deals or general order discounts—helping you get more value from your campaigns.
Site discounts
Some sites feature special discounts directly within the Marketplace. These discounts are displayed below the standard price, which appears with a strikethrough for easy comparison. When added to your basket, the discounted price is automatically applied, and the original price remains visible for reference.
Note: Keep in mind that these discounts are not shown on the discount section of the order summary in the basket which is reserved for full order discounts.
Order discounts
Order discounts can be applied to individual or multiple orders for a limited time and may also be available through promo codes. These offers reduce the subtotal cost of your order and will be clearly displayed in the Discount section of your basket’s order summary.
Keep an eye on the promo carousel on your homepage for the latest active discounts and promo codes!
Using your credit balance
Credit balances in the ICS-digital Marketplace are issued as a result of invoice disputes or publication-related issues. These credits are arranged directly between you and your Account Manager or our Finance team, and are issued through the platform to a specific invoicing entity.
You can apply your available credit balance at any time during checkout. On the basket page, simply select the “Apply Credit Balance” option. The system will automatically apply as much of your credit as possible based on the order total:
- If your order value is equal to or higher than your credit balance, the full balance will be applied.
- If your credit balance exceeds the order value, only the amount matching the order total will be used.
Any remaining balance will stay available for future use under the same invoicing entity.
Additional charges
Depending on the details of your company’s invoicing entities and your currency choice, there might be additional charges applied to your orders like VAT or currency conversion charges.
VAT
A 20% VAT charge will be applied to your order if the invoicing entity you have selected has VAT enabled and a valid VAT number provided. This tax is required by law for qualifying transactions and will be clearly itemised on your invoice and order summaries.
Note: VAT is only applicable to UK based businesses in the ICS-digital marketplace platform.
Currency Conversion Charges
A 5% currency conversion charge will be applied to orders processed in currencies other than British Pounds (GBP). This fee covers the costs associated with foreign exchange processing and ensures accurate conversion at current market rates.
Payment terms
Specific payment terms will be applied to your invoicing entities depending on your preferences. These should be agreed upon directly with your account manager. First-time orders are always invoiced per order and due upon receipt, regardless of the selected invoicing mode or agreed upon payment terms. Agreed payment terms will be applied on any invoices created after the first payment is received.
Your first order
If this is your first time working with us, your initial order—and any subsequent orders that generate an invoice before the first payment is received—must be invoiced and paid upon receipt.
Please note that work on any other orders under the same client will be paused until all outstanding invoices are paid in full.
Description of invoice statuses
Draft
An invoice will be in status “Draft” before it has become payable and it will list all the items and orders that will be invoiced within a month period. Typically, only invoices that correspond to invoicing entities with invoicing mode “monthly” will have invoices in this status. Draft invoices will become payable on 00:00:000 UTC of the first day of the following month. Their invoice will be then set to “Pending” and their due date will be set in accordance to the invoicing entity’s payment terms.
Pending
An invoice is set to “Pending” status whenever it has become payable. A pending invoice will have a due date set based on the payment terms of its invoicing entity. A pending invoice that has not been paid for in full by the due date specified at the time of creation will be listed as “Overdue” which isn’t a new status but rather a flag on a specific invoice.
Disputed
If you notice any discrepancies in an invoice, you can mark it as “Disputed” directly in the system. Simply scroll to the bottom of the summary sidebar on the invoice page and click “Dispute”. Your account manager will be notified and will follow up with you to review and resolve the issue.
Paid
Once our finance department confirms the reception of a payment the corresponding invoice will be updated to status “Paid”. It will remain visible and downloadable for your records.
Void
This status exists for cases where a dispute or a publication issue results in the voiding of an invoice that had been created and shared but not yet paid.
Overdue Invoices
An invoice becomes overdue after the due date established upon its creation. This date is created based on the payment terms defined on the invoice’s corresponding invoicing entity. Once an invoice has become overdue you will still be able to use the platform to select sites and submit orders, however, work on every orders will be paused until the invoice payments have been received.
Dashboard
On your homepage you will be able to find a small dashboard with a few useful insights that might help you quickly understand the current status of your orders and invoices. These are the summaries and tables you will find.
Summaries
Quick numerical insights of your orders, invoices and balances.
Orders in pipeline
Number of orders currently being worked on. You will also be able to see the number of order items that require any action from you as well as those that are currently awaiting publication.
Pending invoices
Number of invoices currently pending for your company. You will also be able to see the current number of overdue invoices for your company.
Credit balance
This will let you see the current combined amount of credit balance assigned to all invoicing entities belonging to your company.
Recent Activity Tables
Tables containing the most recent activity on orders and invoices.
Recent orders
A list of the 5 most recent orders submitted by you along with their, name, number of items and checkout date.
Pending invoices
A list of the most recent pending invoices addressed to any invoicing entities associated with your company.
Recent items requiring attention
A list of items requiring any type of action from your part.
Recent items awaiting publication
A list of items that have been sent out for publication but haven’t gone live quite yet.